|
0 registered (),
191
Guests and
3
Spiders online. |
|
Key:
Admin,
Global Mod,
Mod
|
|
30710 Members
76 Forums
19381 Topics
186931 Posts
Max Online: 577 @ 12/25/23 08:46 AM
|
|
|
#206451 - 08/03/09 10:59 PM
 BayouBlonde's Tutorial for VF Mods Using GIMP
|

Unicorn

Registered: 10/07/04
Posts: 17505
Loc: Colorado
|
Introduction:This tutorial guide is for those wanting to use GIMP to create custom mods for Virtual Families. If you are using another image editor, the instructions regarding program commands will be very different for you, although the procedure for beginning a room will be the same. The techniques I describe for creating and drawing will also be the same. I am told that GIMP is a "clone" of Adobe's Photoshop. If that is correct, the commands for that program may be very similar. The method I describe for beginning a room mod is the one that I developed when I began modding. It is by no means the only correct method. After you have some experience using the program you may find another way that works better for you. The purpose of this guide is just to help you get started. The first thing you should do is read this Introduction to VF Mods . Next, make a back-up copy of your game's images folder. Instructions for how to do this can be found here . NEVER edit the files in your back-up folder. Finally, create a folder that will contain your mods. You can put this folder anywhere you like (in My Documents/My Pictures, in Program Files/VirtualFamilies, etc.) Just be sure that you can remember the location.  In this guide, I will use mouse and menu commands and avoid keyboard shortcuts so that you learn what commands you are actually using and where to find them. You can memorize the keyboard shortcuts later. I believe it is much easier to understand what is going on in the beginning without shortcuts. I will assume that you have read the Introduction to Mods linked above (so that you understand layering and transparency a bit) and that you are familiar with basic Windows commands (select, edit, copy, paste, save, save as, click, double click, drag, etc.) If not, you should see Windows help and learn those functions before continuing. I will be showing you how to create your background map for all your mods and I will create a "tutorial" bedroom that will be intended to show you how to use as many basic tools and techniques as possible. While working on this bedroom, I will use techniques that are not necessarily the way I do things or the easiest way to get a certain thing done. I've chosen a method to do each task so that I can demonstrate as many of the basic tools and techniques as possible. Hopefully, by the end you will realize there are more ways than one to do certain things, and you will have gained a greater understanding of the tools and menu commands and how they function.
_________________________
Barbara
Unicorn
Last Day of Work
|
|
Top
|
|
|
|
|
#206452 - 08/03/09 11:00 PM
BayouBlonde's Tutorial for VF Mods Using GIMP
[Re: LadyCFII]
|
Unicorn
Registered: 10/07/04
Posts: 17505
Loc: Colorado
|
Lesson 1: Creating the Background MapAt this point, you have GIMP downloaded and installed and you are ready to begin creating your own mods for Virtual Families. The first thing you want to do is create a new map, so that you can see all the rooms and yard at once. Open GIMP, choose File -> New. On the Create a New Image Window, set the image size to 2048 x 2048 (the size of the full map in the game.) Click the plus sign by Advanced Options and change the "Fill with" to "Transparency." This makes the background transparent. In GIMP, transparency is indicated by the gray checkerboard. Any time you see that, you know that it will be invisible in the game. 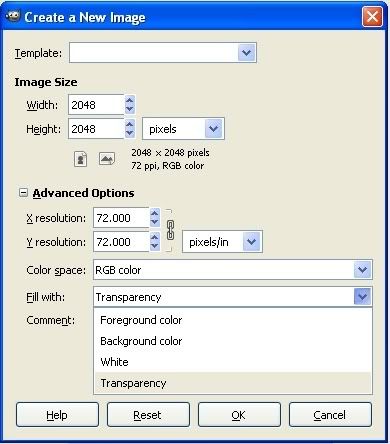 Now we want to set up guide lines that will show us where the map divisions are. This will make it easier to place the original map pieces and will also make it easier and faster to separate our maps when we are ready to put our mods into the game. Use Image -> Guides -> New Guide (NOT by percent.) Each map piece is 512 x 512, so we will set guide lines at increments of 512 both horizontally and vertically. Type in "512" for the position of the first horizontal guide. 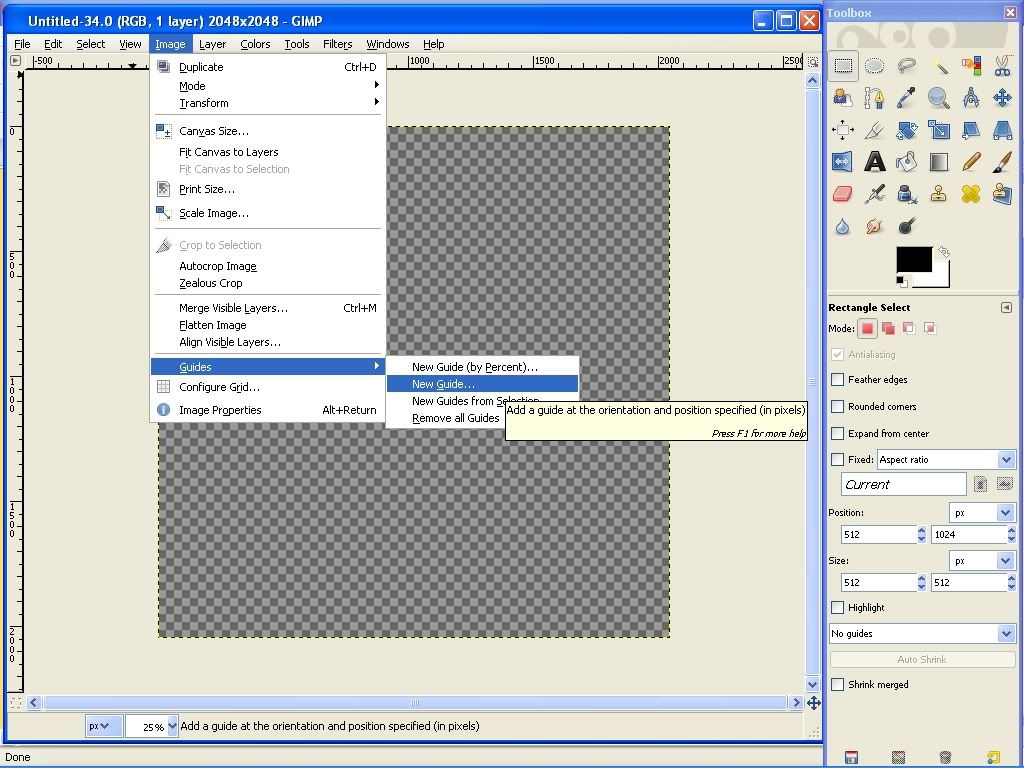 Set another guide at 512 but change the drop down to "Vertical." Continue setting guides both horizontally and vertically at increments of 512 (1024, 1536.) You should have a grid of sixteen equal squares. 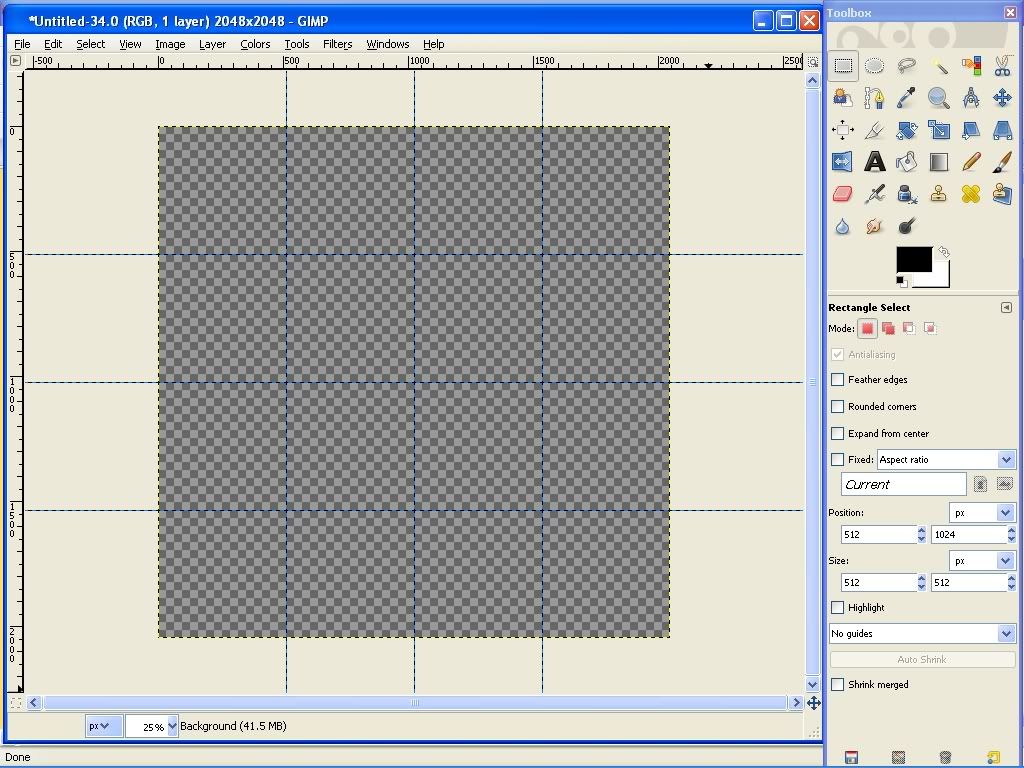 You are ready to begin inserting the background map pieces. Use File -> Open and navigate to the images folder. Choose MapX0Y0 and open the file. Use Edit -> Copy to copy the image to the clipboard. Minimize or close that map piece and return to your grid with guidelines. Use Edit -> Paste. The image will appear with a flashing dotted line around it, indicating it is selected. (The flashing line is called "marching ants.") When you have something selected in GIMP, any edits you make will ONLY be made inside the "marching ants." When you hover your mouse over the current selection, you should have the directional arrows cursor indicating that you can click and drag to move the image. Click and drag to position the image in the top left corner. When you hover outside of the "marching ants" the cursor will turn into an anchor, indicating that a click will "anchor" the selection down into place. Don't anchor it until you are sure you have it in the correct location. Save your work in the standard GIMP format xcf so that you can add layers later and your transparency will be maintained. Don't forget to do this every so often or you will end up very annoyed with yourself. 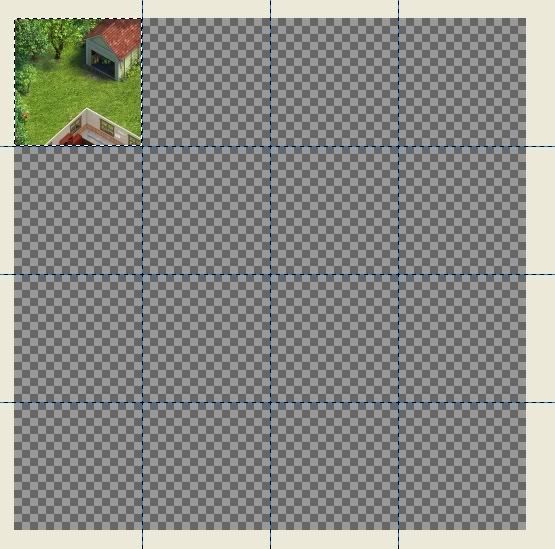 Open MapX1Y0 and repeat the steps above to place it on your background map. The guidelines should make it easier for you to insert the pieces in the correct locations. Continue until you have all sixteen map pieces placed. You now have your background map complete (you don't have to do this again) and are ready to begin modding. Save your map and do not ever change this background layer. All changes to this image should be made on new layers. 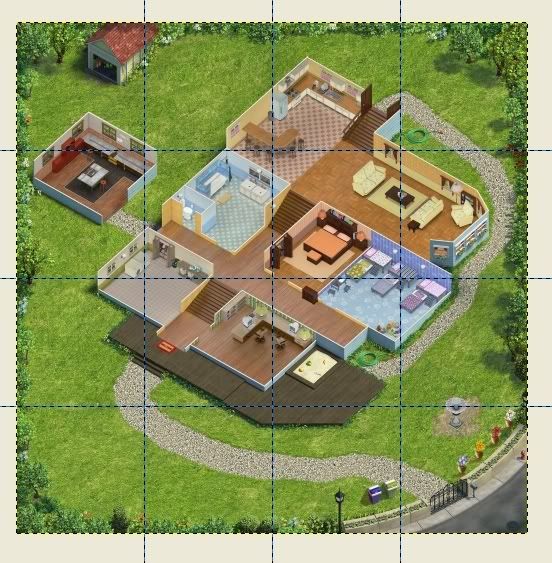
_________________________
Barbara
Unicorn
Last Day of Work
|
|
Top
|
|
|
|
|
#206453 - 08/03/09 11:01 PM
BayouBlonde's Tutorial for VF Mods Using GIMP
[Re: LadyCFII]
|
Unicorn
Registered: 10/07/04
Posts: 17505
Loc: Colorado
|
Lesson 2: Isolating a Room to ModFor our example, we will mod the master bedroom. To zoom in, use View -> and choose the percentage you would like to magnify in on that room. We will copy the room to a new image to begin our work. First, we must separate it. Use the Free Select Tool (in your toolbox) to select the room. I use 400% when selecting rooms - you can use a higher or lower percentage, depending on your vision, monitor size and personal preference. In the bottom section of your toolbox, you can see the current tool's settings. 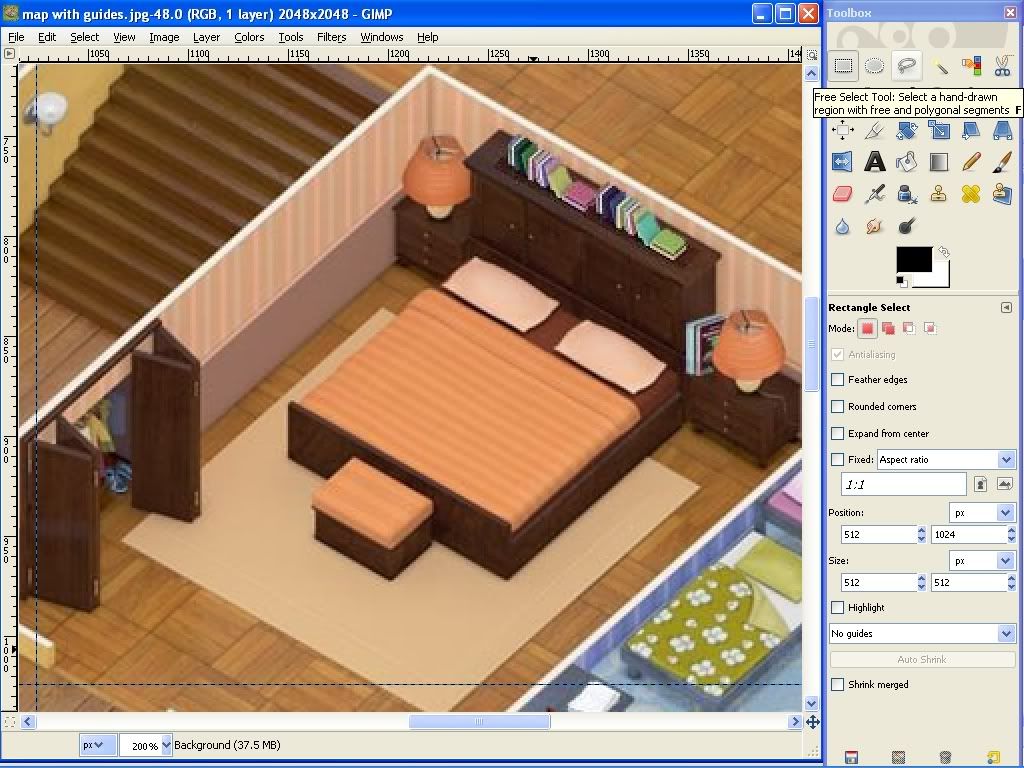 To use the free select tool, click to make a starting point. The tool will automatically draw straight lines between points. If you double click it will end the selection. I always set the tool options to "Add to the current selection" in case I accidentally double click before I am finished. Begin selecting the room at the point you want to separate it from the main image map. Because you will not want to edit the white line between walls and floors, try not to include it in your selection. When you have reached your beginning point again, double click to "set" the selection and you should see the "marching ants." Zoom out to make sure you are satisfied with your selection. Use Edit -> Copy to copy the room to the clipboard. 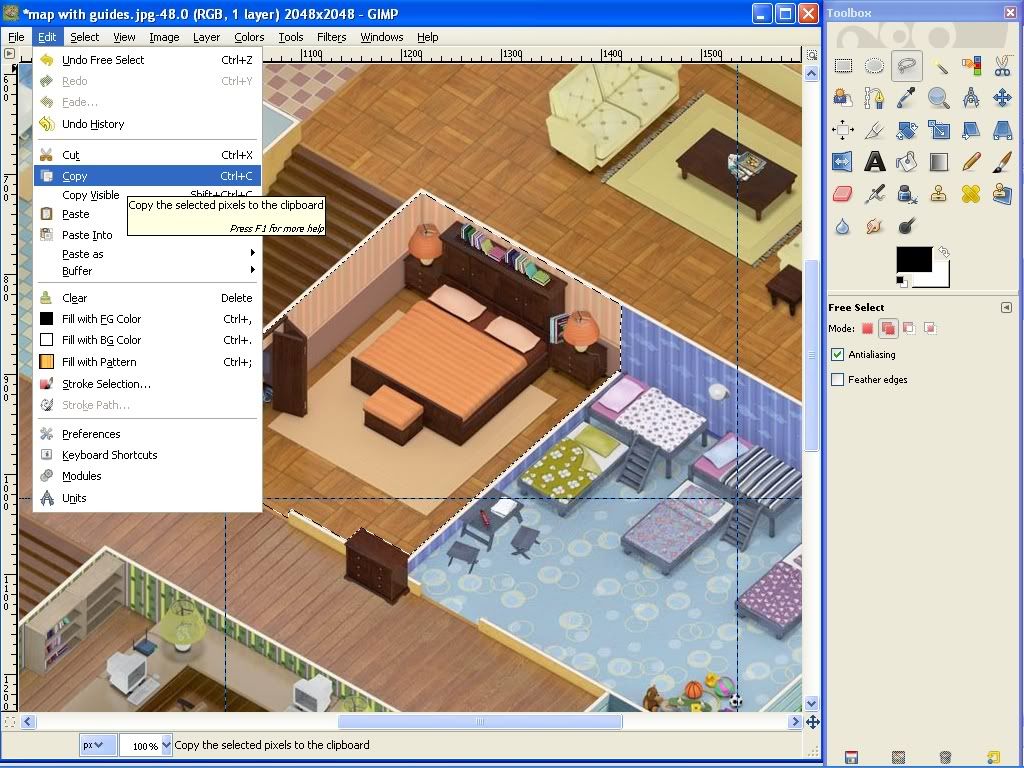 Then use Edit -> Paste As... New Image to create a new master bedroom image for modding. Because you set the main image's background to transparency, GIMP will automatically make the new image have a transparent background as well.
_________________________
Barbara
Unicorn
Last Day of Work
|
|
Top
|
|
|
|
|
#206454 - 08/03/09 11:02 PM
BayouBlonde's Tutorial for VF Mods Using GIMP
[Re: LadyCFII]
|
Unicorn
Registered: 10/07/04
Posts: 17505
Loc: Colorado
|
Lesson 3: Breaking Down a RoomThe first thing I do before beginning to change a room is to separate it out. We will begin with the floor. Again, zoom in and using your free selection tool, start in one corner where you can see the floor and wall junction and begin selecting. When you "run into" a piece of furniture or other object, just let the tool draw the line where the edge of the floor should be. 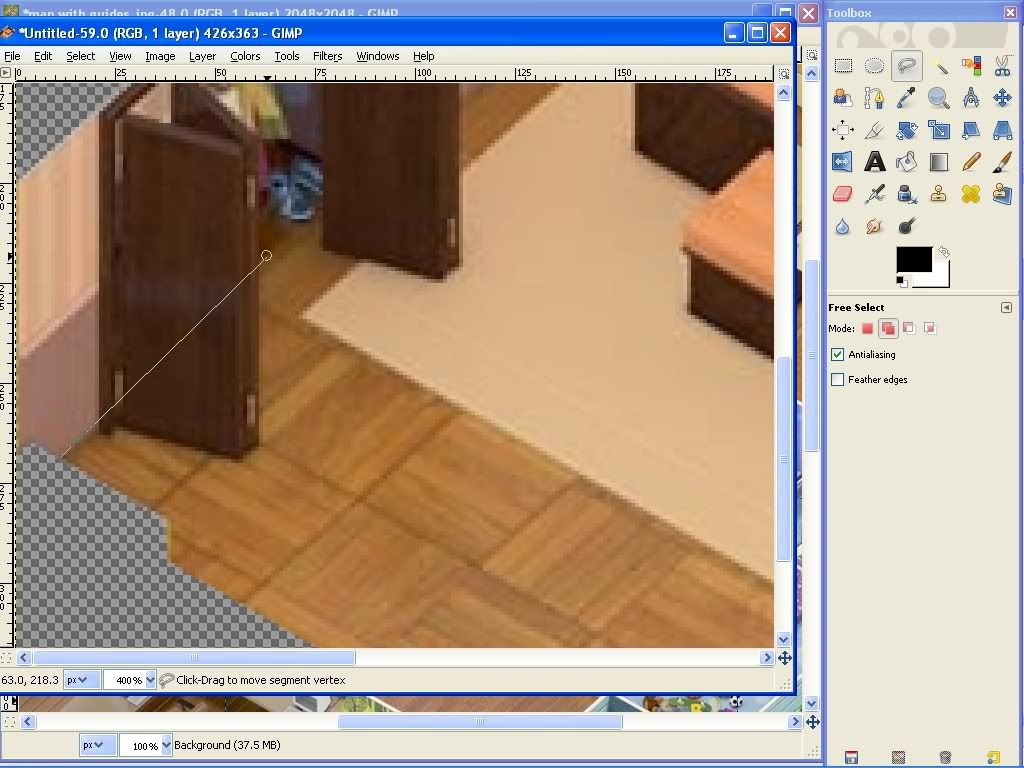 When you reach the edge of the image and the transparency, you don't have to be careful selecting because the transparent section is already invisible and will not show when copied. When you have the floor selected, use Edit -> Copy. Now we will create a new layer named "Floor." Use Layer -> New layer. GIMP will automatically set the layer size to the same as the image size. When the new layer is created, if you hover your mouse outside of the image (on the toolbox) you will notice the text at the bottom of your window has changed. You will see the name of the current layer you are on (Floor) and the size of that layer in memory. 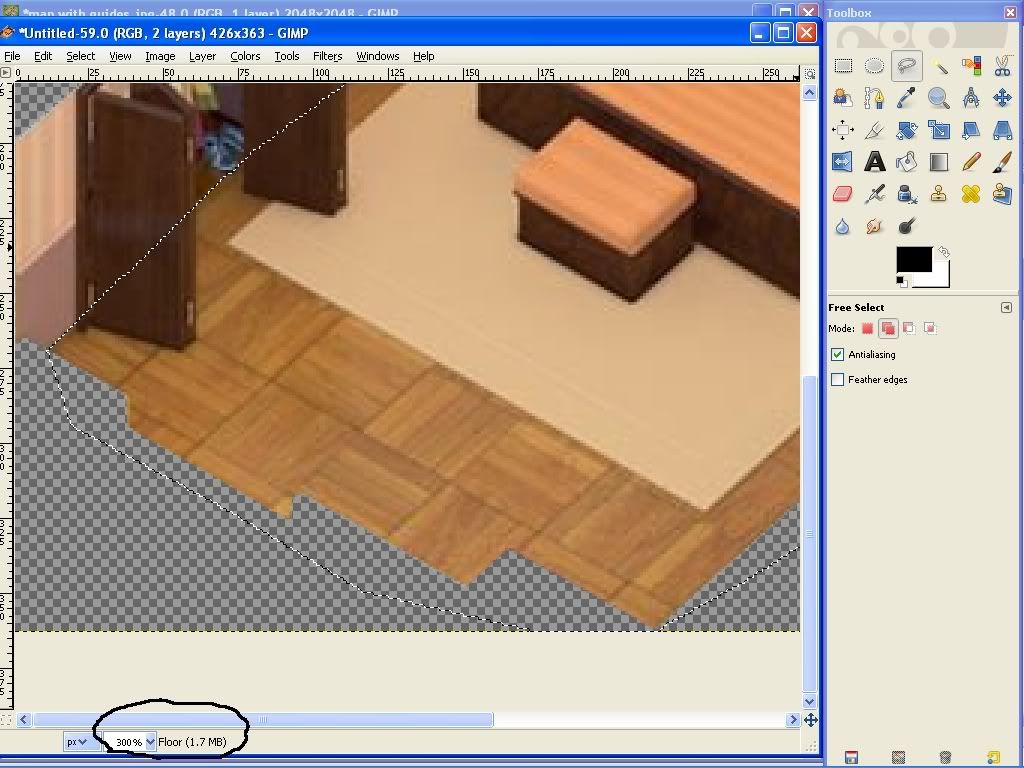 This is very important. Any edits you make will always be made on the current layer and ONLY on the current layer, even if it is not visible. Use Edit ->Paste to paste our newly selected floor area onto our new floor layer. Be careful not to move this new selection. Before we anchor it down into place, we are going to paint it a solid color so that we can see it easily later. Click the Bucket Fill Tool in your toolbox and change the Affected Area to "Fill whole selection." Click on the foreground color square and choose the color for your floor (you will change this later, but go ahead and choose something close to what you want for the room.) My daughter wants hot pink and black with animal prints so I am choosing a charcoal gray for now. 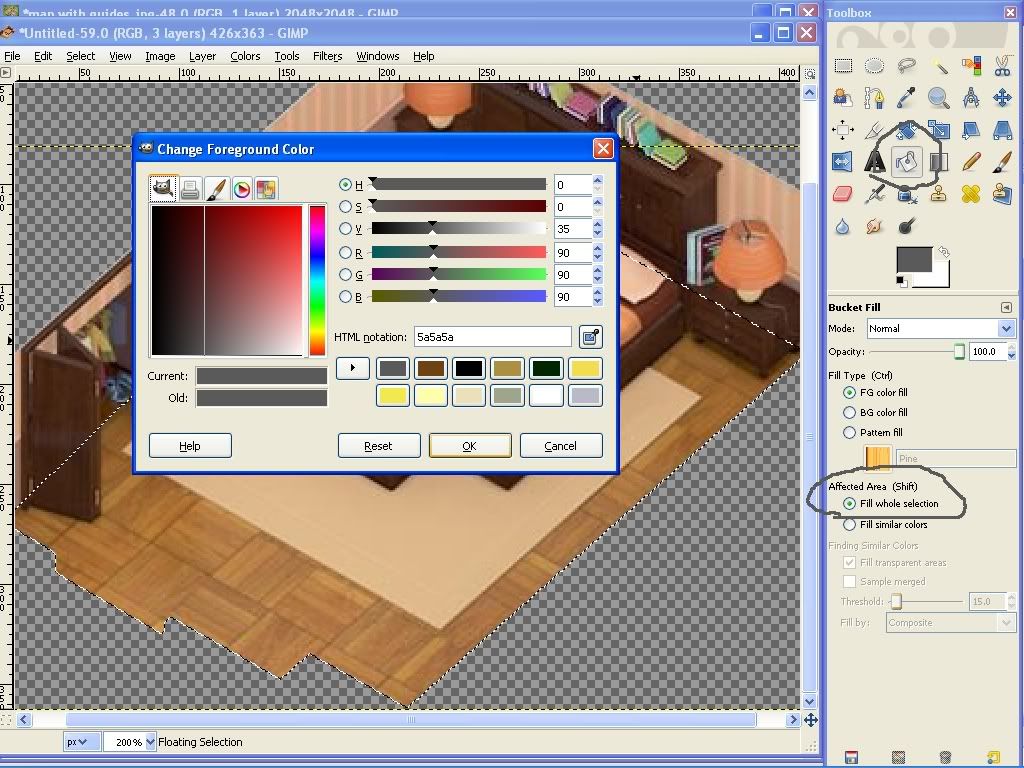 Click somewhere inside the marching ants. You should see your new solid color floor. Now, we will anchor the floor down into place on its layer. Simply click when you have the anchor icon or use Layer -> Anchor Layer. Remember to save your work. 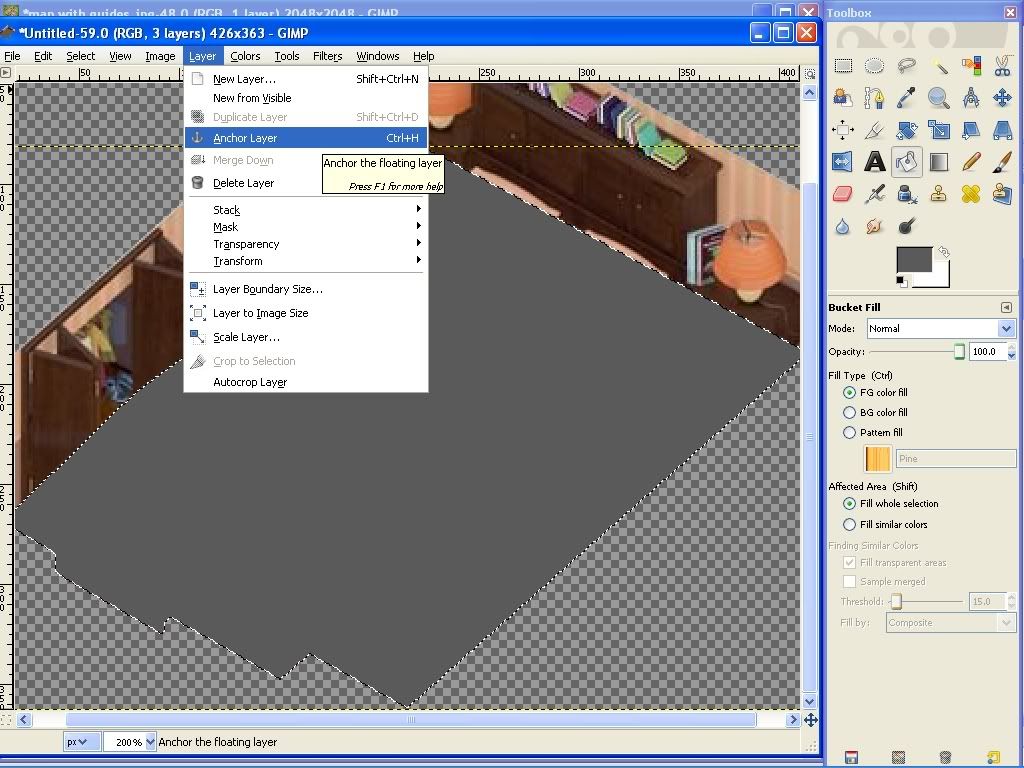 The floor is in our way for the moment, so we will move it below the background layer so that we can't see it. To do this, use Layer -> Stack -> Lower Layer. Notice that you still see the name "Floor" at the bottom of the window. Even though you cannot see the layer, you are still "on" that layer and any changes you make will be made on that layer whether you see them or not. We don't want to change anything on this layer now, so we will select the background layer again. Use Layer -> Stack -> Select Top Layer and make sure that the bottom indicates you are on the "Background" or "Pasted Layer." Now we will separate the walls. Repeat the procedure for the floor, except select the walls this time and create a new layer named "Walls." Again, after pasting the copy of the walls onto your new walls layer, we want to color it before we anchor it down. Choose a color similar to one you will use for the room, but remember you will edit it to perfection later. Anchor the layer into place, then lower it as before to get it out of our way. Don't forget to save your work. Again, be sure you have returned to the Background or Pasted Layer. It is time to begin selecting the furniture and other items in the room. I will start with the rug, but you can start on any object you like. I prefer to work from the bottom and go up because items that are "underneath" do not have to be so specific. For the rug, again you will use your imagination to draw the edges where it goes underneath the bed and closet. Allow the free select tool to draw the lines straight for you. Use Edit -> Copy, create new "rug" layer, then Edit -> Paste and bucket fill the rug before anchoring it down. Continue in this manner for all items in the room, except don't color the other objects. I will explain how to do the closet in a bit more detail. First, go around the entire outside edge of the closet, as you did with the other objects. You will notice that your selection now includes areas of wall. We don't want those to go with the closet so we need to remove them. On your toolbox, change the Free Select Tool's options so that it is set to Subtract from the current selection. 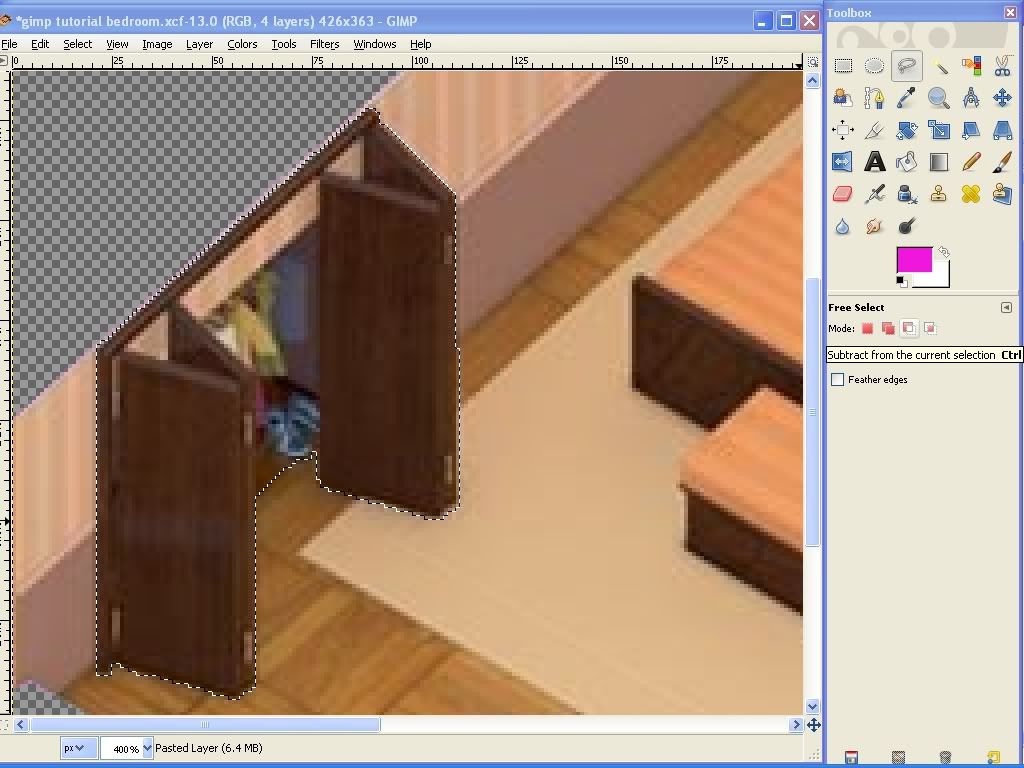 What that means is that the next thing we select will be removed or "cut out" from what we have selected now. Your cursor should now have a minus sign next to the free select icon to indicate this setting is on. Once you have that setting chosen, go carefully around the areas of wall (there are 3.) 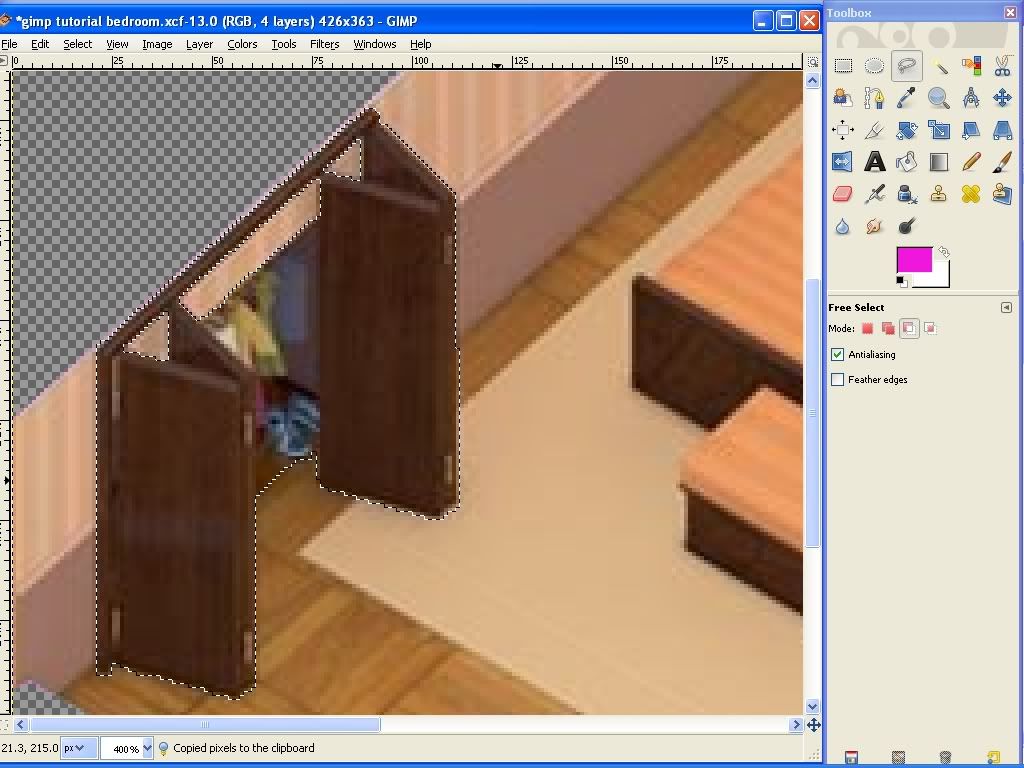 Again, use copy and create a new "closet" layer to paste the closet on. If I raise my colored wall layer, you can see why removing those areas was important. (See screenshot) 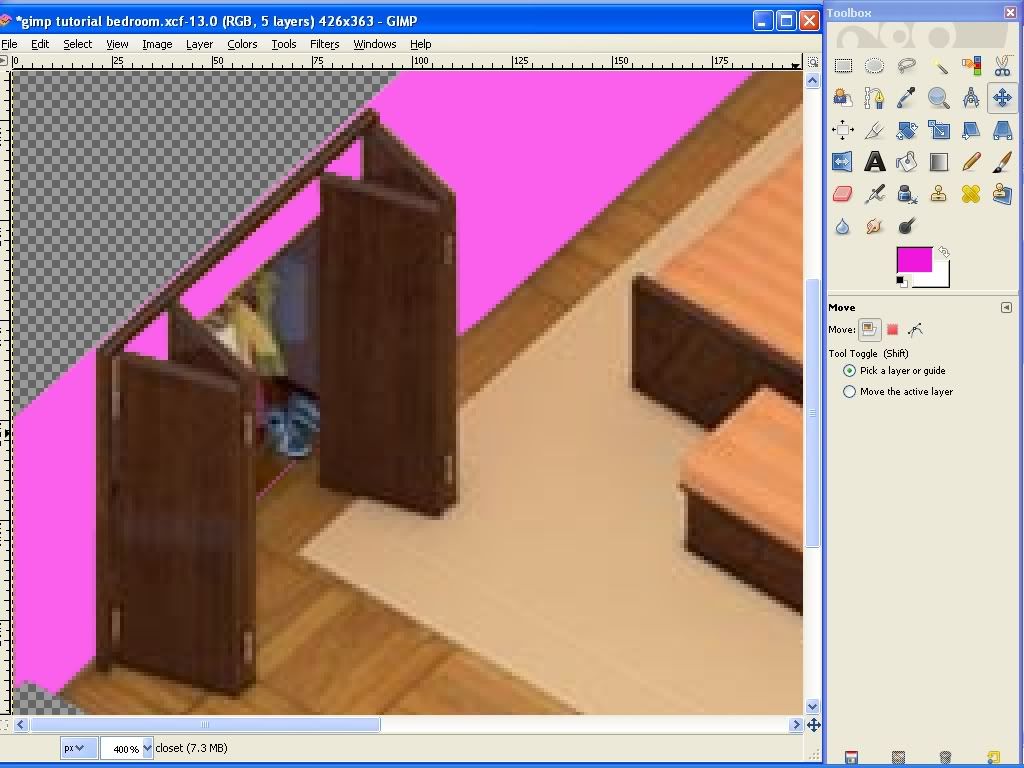 Once you have isolated every item (each nightstand, the bedframe, closet, and bed bench, comforter and pillows) you are ready to move the Background or Pasted Layer to the bottom. Use Layer -> Stack -> Layer to bottom to do this. Use the Layer -> Stack commands to adjust the positions of your layers so that you have an image similar to the one in this screenshot. 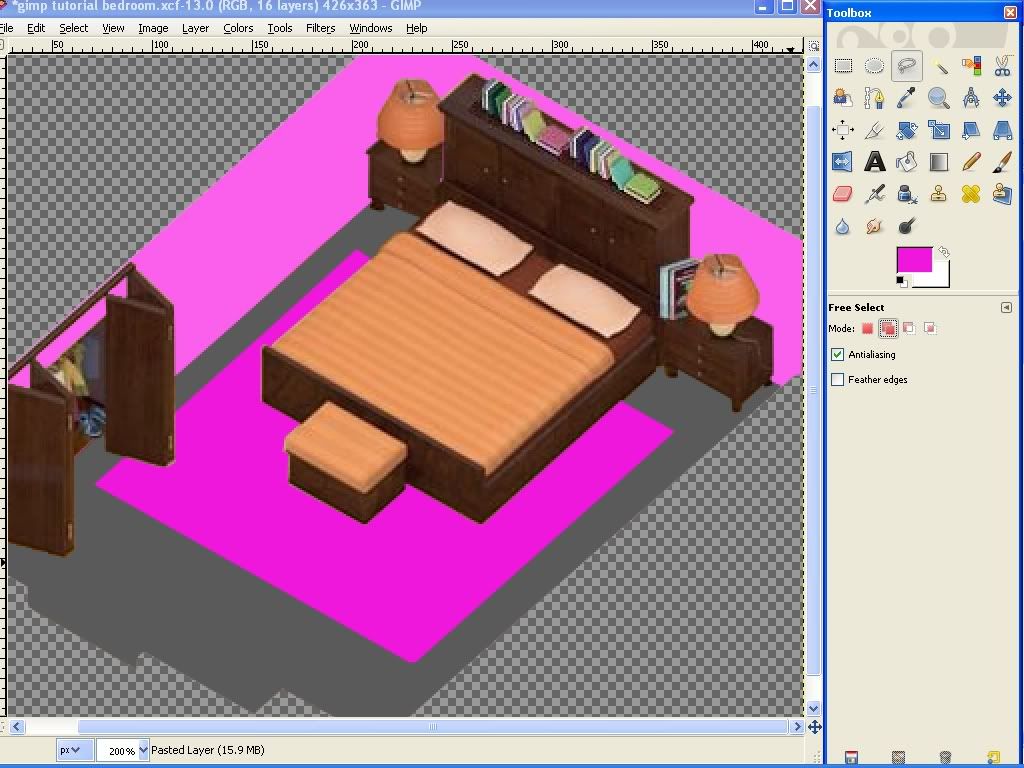 You want to see the furniture and closet on your wall, floor and rug. Remember to save your work. You are now ready to begin recoloring.
_________________________
Barbara
Unicorn
Last Day of Work
|
|
Top
|
|
|
|
|
#206455 - 08/03/09 11:03 PM
BayouBlonde's Tutorial for VF Mods Using GIMP
[Re: LadyCFII]
|
Unicorn
Registered: 10/07/04
Posts: 17505
Loc: Colorado
|
Lesson 4: Begin with the Room's FocusBecause the bed is the focus of this room, I will begin with it. First, choose a pattern for your new comforter. You can use one of the patterns that came with GIMP or find one online. Select the bucket fill tool and change Fill type to Pattern fill. Click the colored square to open the pattern menu. You will see all patterns that are currently installed. To install a new pattern, simply open it with GIMP and use Save As to save it with the .pat file extension. Then refresh your pattern menu or restart GIMP to have the pattern appear in your menu. Alternatively, you can use anything on the clipboard as a pattern. Just choose the first square in the pattern menu after you have copied the pattern you want to the clipboard. I will be using a pink leopard print for my daughter's bed. Choose your comforter layer and use the bucket fill tool to color it with your desired pattern. If you want the sheet fold to be a different color, remember to create a separate layer for it in the steps above. On the comforter layer, use the magic wand selection tool and just click anywhere off the comforter. You have just selected the transparent area around the comforter. Because this is the opposite of what we want, use Select -> Invert Selection to reverse it. Now you can use the bucket fill tool to fill the entire selection with your new pattern. 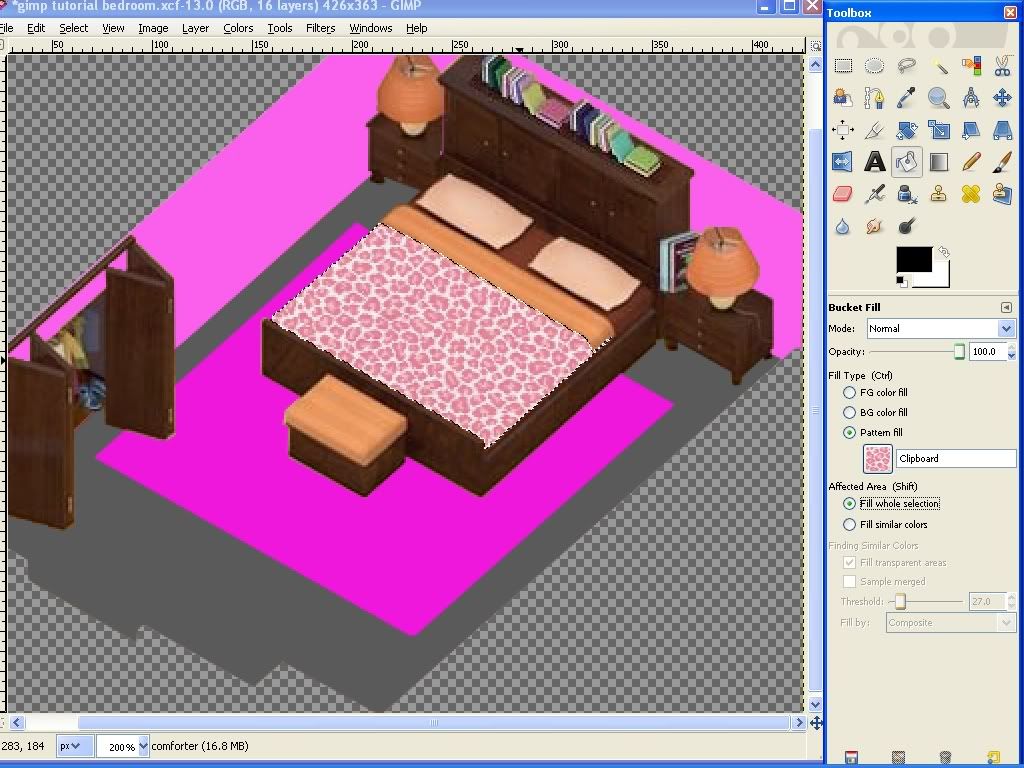 I want the sheet fold to have one of the colors in my pattern. I will use the Color Picker Tool to "grab" that color from this layer before moving to the sheet fold layer. 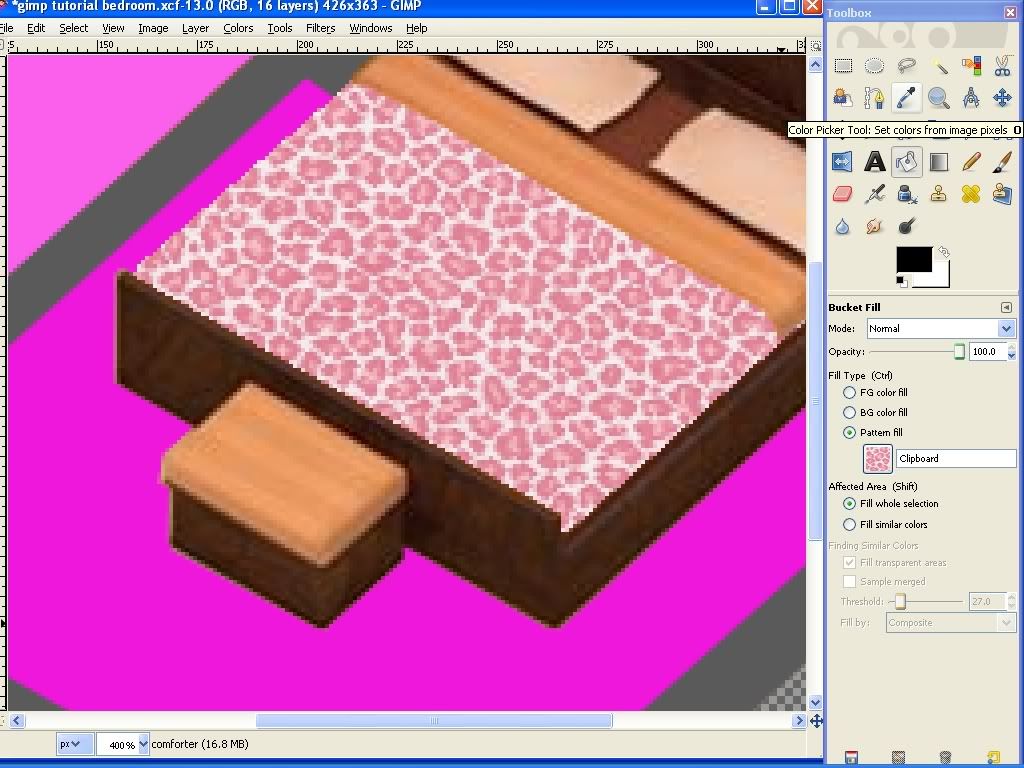 Use the same procedure to select the sheet fold. If we use the bucket fill tool to fill the sheet fold, we lose all the shading that makes it appear folded. So, now that we have a reference color to go by, I will show you how to use Colorize to recolor a selection. With the sheet fold selected, use Colors -> Colorize. There are 3 settings. Hue is the main color. Saturation is the amount of that color that will be used. and Brightness is the lightness or darkness of the color (the shade.) 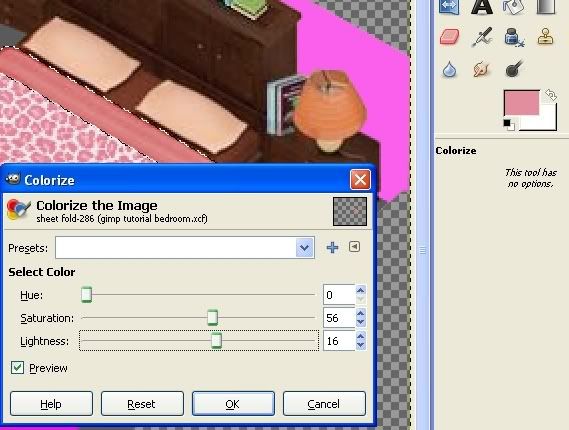 Begin with the hue and adjust it as close as possible to the color you are wanting. Make sure the preview box is ticked so that you can see the changes as you are adjusting. Next adjust the saturation. The higher number indicates more color, while a lower number will have less color and will be more gray. Finally, adjust the brightness. Keep playing with these settings until you have the color you want. You can see on the preview how the shading of the original sheet fold remains in place. Don't forget to save your work. I will color the pillows with the same pattern I used on the comforter. You can use your pattern or use colorize to recolor them as you like. I want to make the pillows a bit larger, so I will select them one at a time and "scale" them to the size I want. Again, use the Fuzzy select tool and invert selection so that you have the pillows selected. Now use the Free select tool and set it to Subtract from the current selection. Use it to remove one of the pillows from the selection. 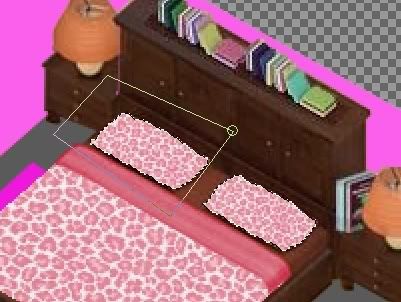 Choose the Scale Tool from the toolbox. Click once on the selected pillow and the scale tool options will appear. You can adjust the size in this window, or simply click on the image and drag. 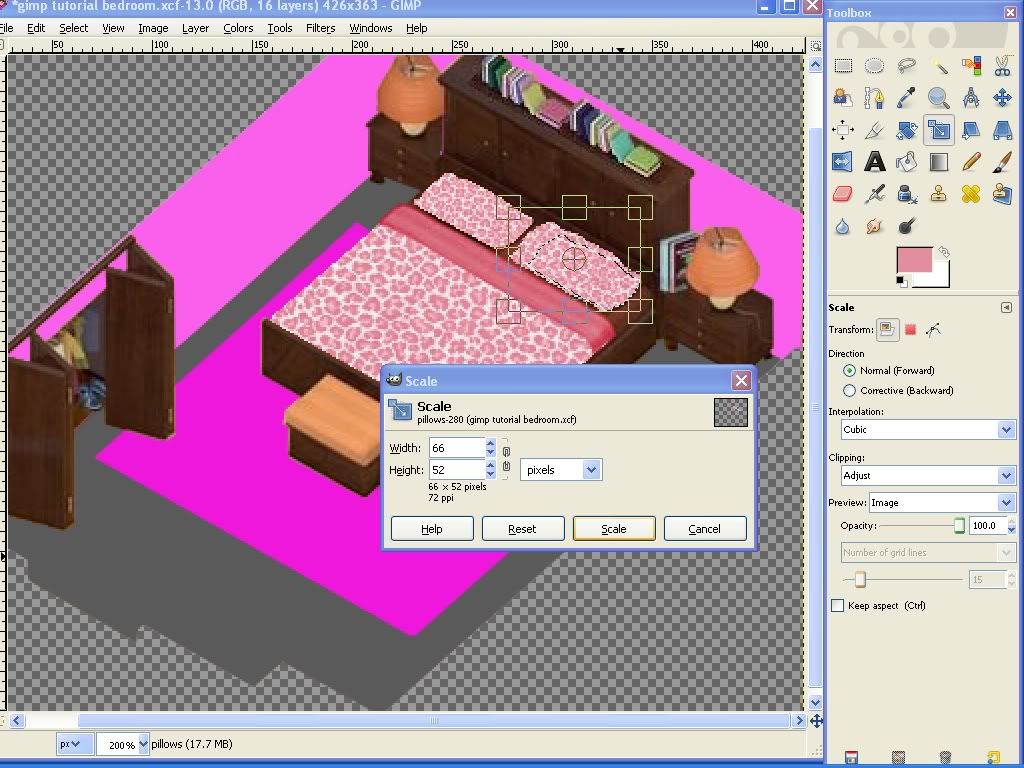 If necessary, use the Move Tool to reposition the pillow so that it is where you want it. To use it, just click on the selection and drag it into place. Repeat this procedure for the other pillow. Remember to save your work. Hopefully, you are beginning to see your bed take shape. By now you are probably realizing that the bottom sheet does not match your new bedding at all and you want to change it. However, we didn't make a layer for it. So, we should do that now. Use the Layer menu to select your Background or Pasted layer and move it to the top. Select the bottom sheet area, remembering that the sheet fold and pillows will be on top of it. Use Edit -> Copy. Now return the background layer to the bottom using the Layer menu. This is the only keyboard shortcut I will teach you. :P Use Page Up and Page Down to go through your layers until you are above your bedframe, but below your comforter. That is where the bottom sheet would be, so that is where we will put its layer. A new layer is always created on top of the layer you are currently on. Choose the bed frame layer and create a new layer using the Layer menu. Use the skills you have learned above to color the sheet with bucket fill or colorize before anchoring it into place. Remember to save your work.
_________________________
Barbara
Unicorn
Last Day of Work
|
|
Top
|
|
|
|
|
#206456 - 08/03/09 11:04 PM
BayouBlonde's Tutorial for VF Mods Using GIMP
[Re: LadyCFII]
|
Unicorn
Registered: 10/07/04
Posts: 17505
Loc: Colorado
|
Lesson 5: Modding the RoomNow that the bed is starting to look a little more like we want it, the walls and floor look rather plain. Select your rug layer. Use the Fuzzy Select Tool and simply click on your rug to select it. Use colorize or bucket fill to adjust the color or pattern as close as you can to the one you want for the rug. 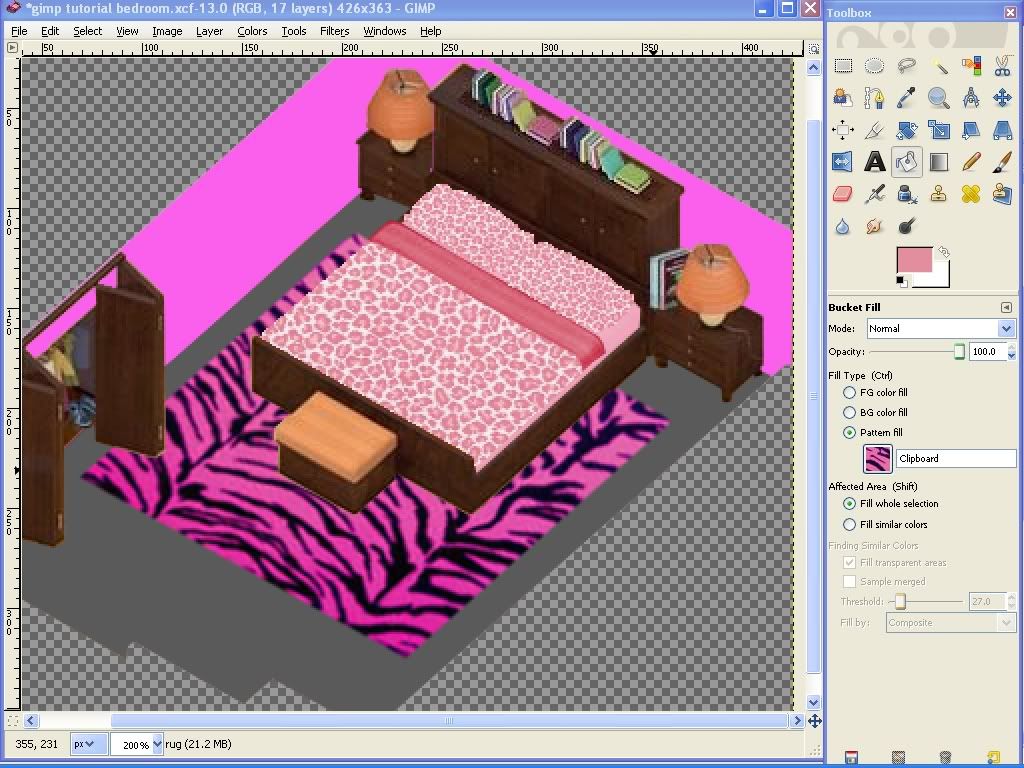 When your rug is the correct color and/or pattern, it's time to make it look like carpet. We will use a default GIMP filter for this. With the rug selected, use Filters -> Artistic -> Clothify. Clothify will give a more plush appearance. If you want a flatter appearing rug, use Canvas to give it a more woven look. Don't be afraid to try these to see which one you like best. You can always use Edit -> Undo to erase it if you don't like it. There are also tons of additional filters available for download to help you achieve the look you want (GIMP can use filters intended for almost any other image editing program.) You can also adjust the depth setting and check the preview to see how that will affect the changes made to the image. Repeat this process for your floor. I can see that I didn't select the bed frame and bed bench as carefully as I thought I had. You may have the same problem and are just now seeing it on your new flooring. We can correct those edges easily. I will correct the bed bench first, so I select that layer. Select the layer you need to correct, then zoom in on the problem area. Now I can see that I selected one row of pixels too many. So, I will choose the Eraser Tool from the toolbox and adjust the size of it to one pixel. Click on the problem pixels to remove them. Easy enough. Don't forget to save your work. 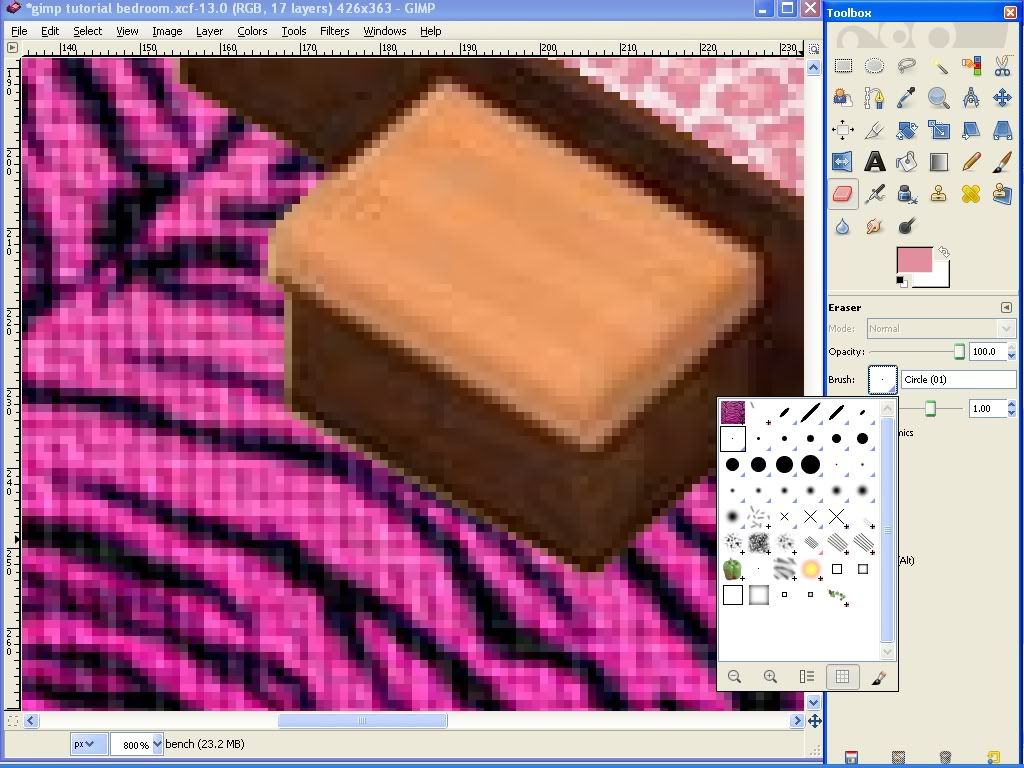 Let's fix the problem area on the bed frame. Select that layer and zoom in. This time I will use the Smudge Tool. Choose it in the toolbox and change the size to one pixel (the size of our problem area.) Smudge blends the colors of nearby pixels together, including transparency. Click on the wood of the bed frame and drag that color onto the problem area. Continue until the problem area is no longer visible. 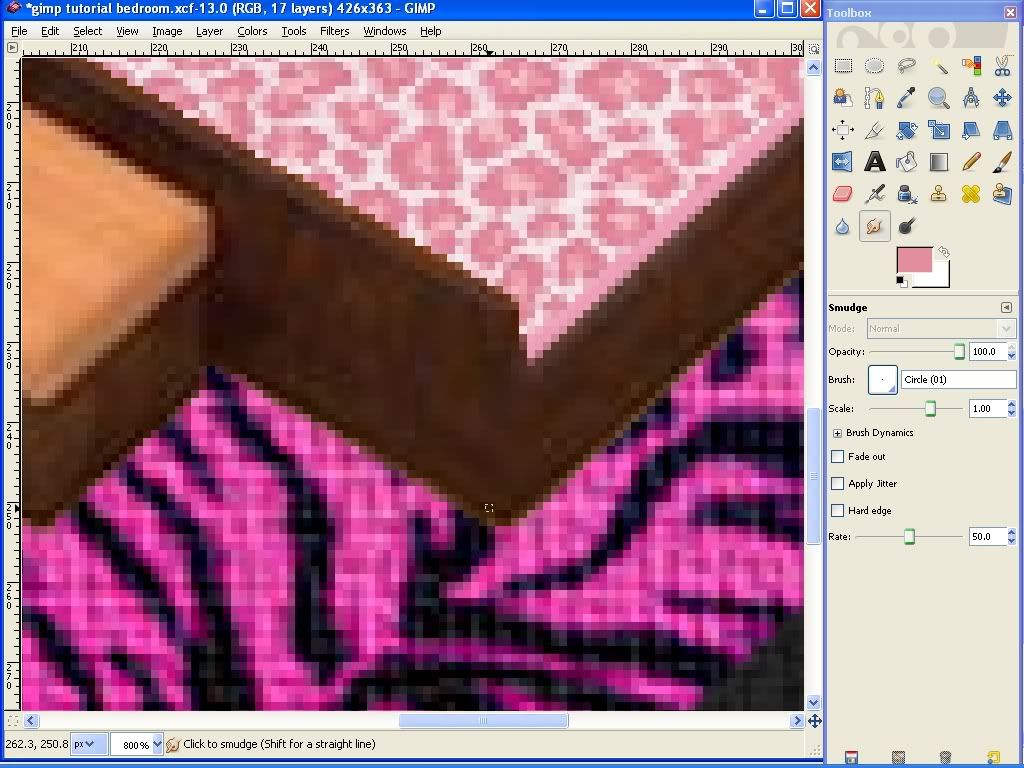 Smudge is very useful for helping to make round edges appear more round or helping edges that appear to "stand out" when they shouldn't. Use either of these tools to correct the edges of any other problem areas that you see. Now I will create a wallpaper. I want to use hot pink and black and have them fade into each other. To get the effect I want, I need to create this as a separate image and use it as a pattern. Use the Measure Tool to measure the height of the wall. The measurement shows at the bottom of the window, where the layer name is. It is approximately 80 pixels.  I'll create an image 90 pixels high (to make sure I have it covered) and however wide I need for my pattern to repeat. Because I want hot pink and black, I will set my foreground and background colors to these. Just click on the color square to change to the color/s you want. Choose the Blend Tool from the tool box. Click the gradient color square and change the setting to the one you want to use. Click and drag on your new image. The gradient will go in the direction you drag. 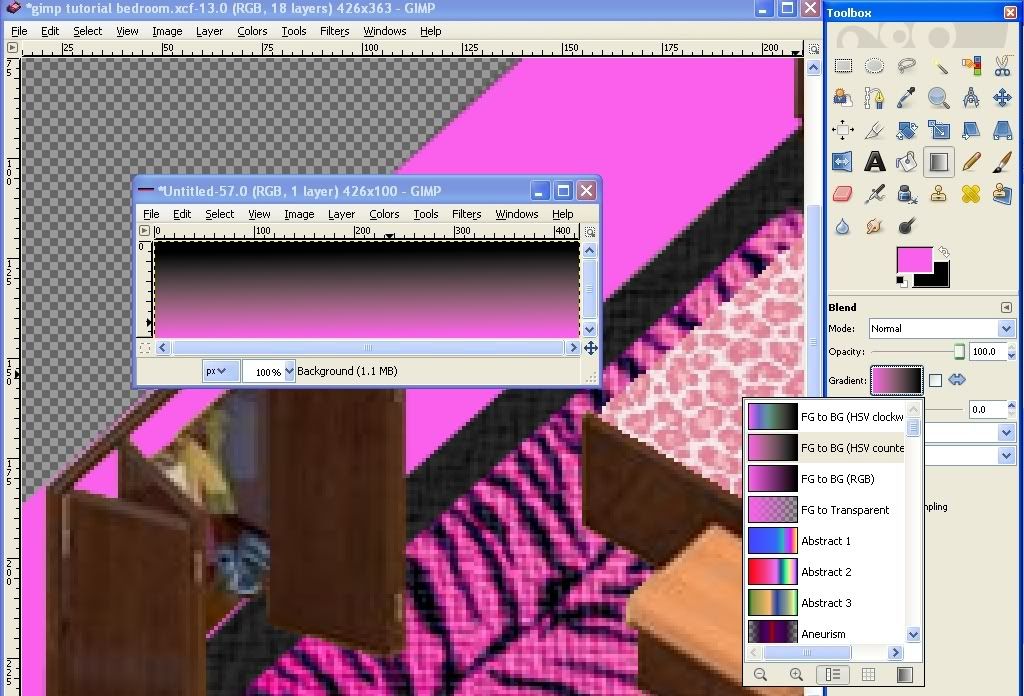 You may need to do this a few times to get it the way you want it. I will be using a top to bottom gradient. When you have the gradient you want, copy it to the clipboard and use the bucket fill tool to fill your wall with the pattern. Remember to save your work.
_________________________
Barbara
Unicorn
Last Day of Work
|
|
Top
|
|
|
|
|
#206457 - 08/03/09 11:04 PM
BayouBlonde's Tutorial for VF Mods Using GIMP
[Re: LadyCFII]
|
Unicorn
Registered: 10/07/04
Posts: 17505
Loc: Colorado
|
Lesson 6: Making Adjustments and 3D EffectsAs you are working, you may find the colors in the different patterns you have chosen do not match as well as you thought they did. You can always adjust them. I will adjust the colors in the leopard pattern on the comforter and pillow shams to better match those in the rug and walls. So, I select the comforter layer and use Colors -> Color Balance. 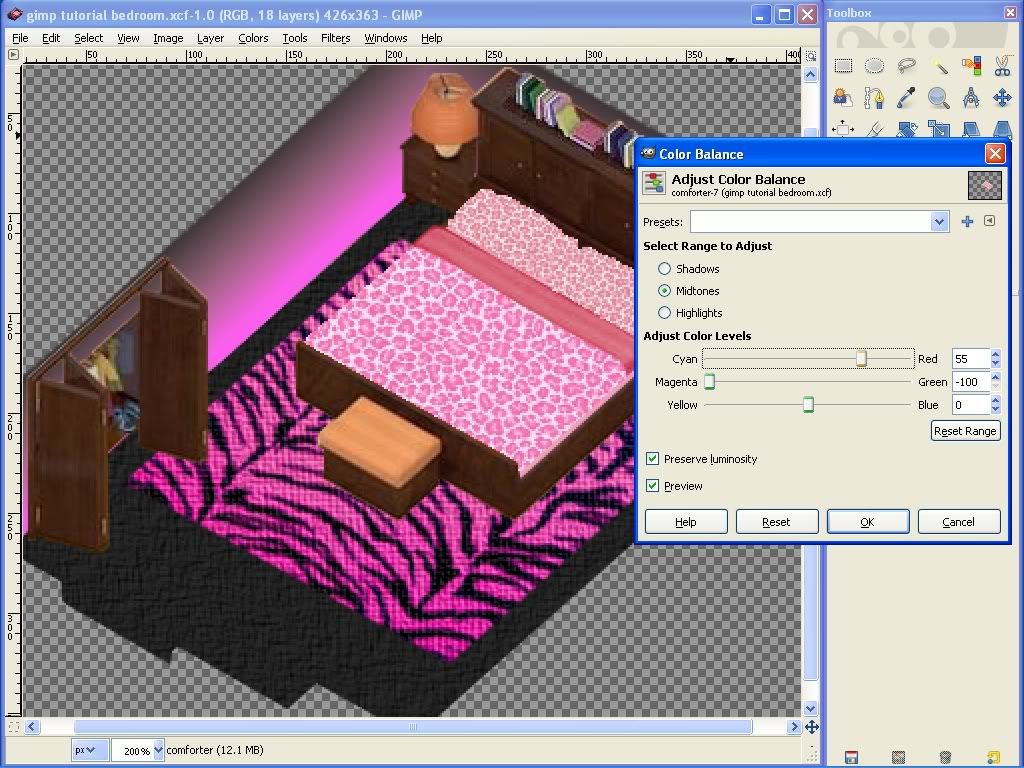 You can adjust the amount of each color in the shadows, highlights and midtones of the pattern separately until you have exactly the look you want. Always leave the preview box ticked so that you can see the result before pressing OK. Or, you may want to change your pattern completely. 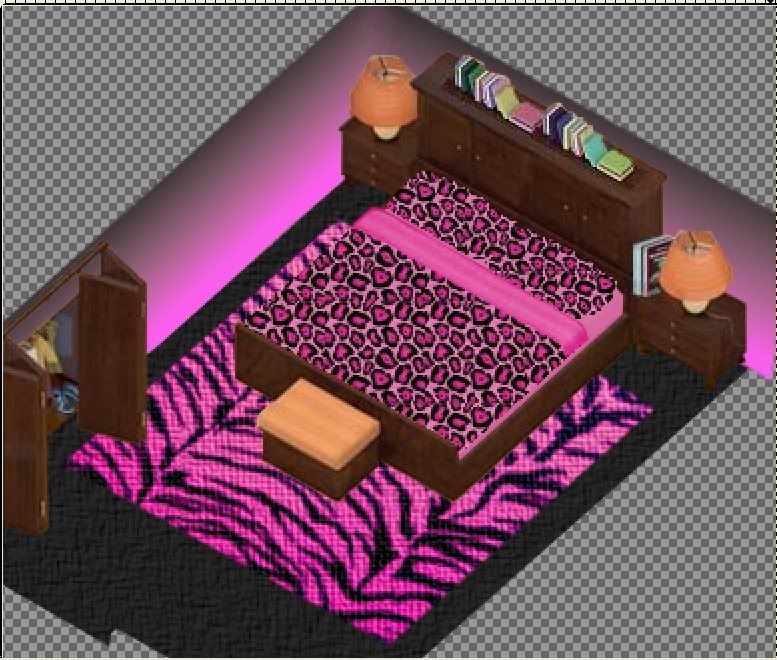 That is the fun of creating! The bed bench cushion is looking really out of place now. We should color it. If you use colorize, you will be fine because it will retain the shading that gives it its shape. If, however, you use the bucket fill tool to fill it with a pattern or color, you will see that you now have a flat shape that no longer resembles a cushion. 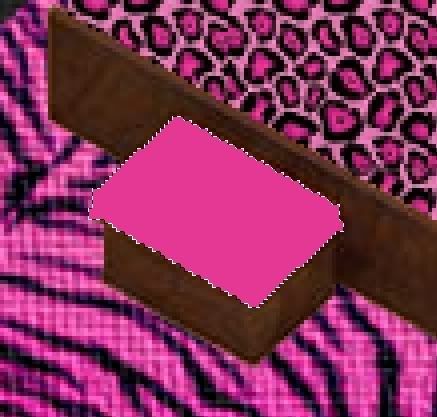 It's time to learn about 3 dimensional effects. The trick to making something appear 3D is light and shadow. When you shade something (add black to it, or make it darker) you make it appear farther away or smaller to the eye. Conversely, when you highlight something (lighten, or add white to it) you make it appear closer or larger. I will demonstrate this on the bed bench cushion. You can refer back to your original background image to help you understand this a little better. If you think about the way light falls onto the bench cushion, it would hit the top, flat section of the cushion and be shaded beneath that on the sides of the cushion that angle down toward the floor. So, we will leave the flat section of the cushion alone for now and shade the side and front to make them appear 3D. Select the area you want to shade so that you don't accidentally shade anything else. Use the bucket fill tool to add black (click the foreground color square to change the color to black if necessary) and adjust the opacity (the opposite of transparency) to around 14-15% and use it to shade the selection. 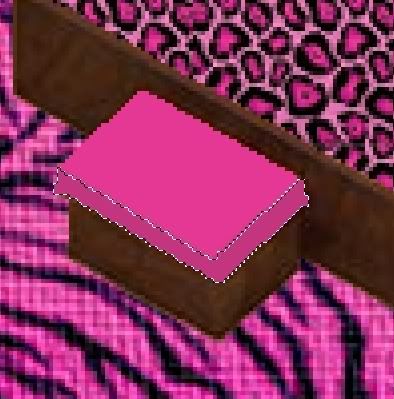 Because more light would hit the top edges of the bench, we will use the pencil tool to add white to that area as a highlight. Click the dual arrow icon to swap the foreground and background colors so that your active color is now white. Choose the pencil tool from the toolbox and set the opacity to around 10-11%. Choose a 3 pixel size fuzzy brush, to help us make the edges not so sharp. Use the pencil tool to highlight the top edges of the cushion. Use the Sumdge tool to blend these until you are happy with the look. Remember to save your work. 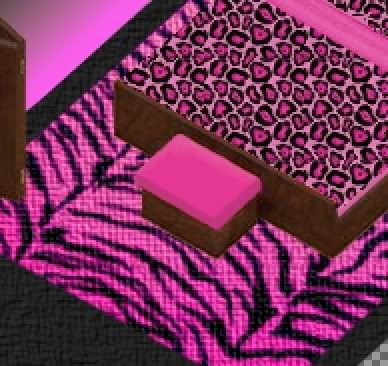 You can see the difference between the flat appearance without shadows and highlights and the 3D appearance of the one with them in the image below: 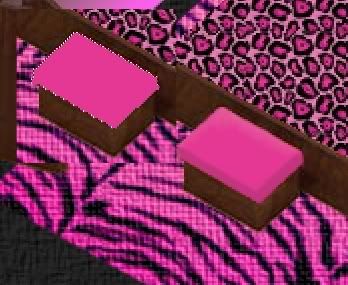 Use the same shading and highlighting techniques on the comforter and bottom sheet to given them the appearance of coming down on the sides of the bed and making the mattress look "full." I will use the same techniques to draw a few throw pillows on the bed. Start by drawing a basic square with the pencil tool, then use the eraser tool to trim in the sides where the edges would be "pulled" toward the middle. Shade the bottom and side of the pillow, while highlighting the areas you want to appear more full. 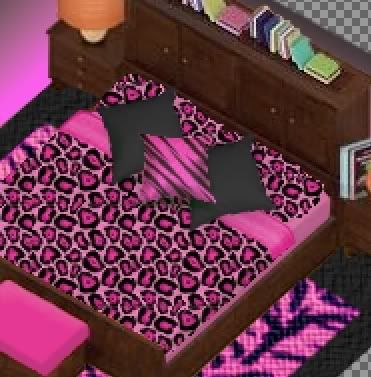
_________________________
Barbara
Unicorn
Last Day of Work
|
|
Top
|
|
|
|
|
#206458 - 08/03/09 11:06 PM
BayouBlonde's Tutorial for VF Mods Using GIMP
[Re: LadyCFII]
|
Unicorn
Registered: 10/07/04
Posts: 17505
Loc: Colorado
|
Lesson 7: Understanding PerspectiveIt would seem that the easiest mod to do would be to cut and paste an image from outside of the game into the game's image maps. However, most images you find online (or elsewhere) will be taken at eye-level. Meaning, you are looking directly at them. In the game, we have an overhead view. These different viewpoints are called "perspective," the angle at which you see something. So, you will find that if you just paste another image in, it will often look out of place, like it doesn't belong. That's usually because the perspective is wrong. I will demonstrate this with a tiger print for the wall. If you follow along with this portion of the tutorial, remember to delete your wall hanging before importing your room into the game, because in the game, the "paintings" will be on the wall in the place I am going to use. The image you choose will most likely be too large. So your first step before even copying it will be to scale it down. Use Image -> Scale Image and choose a size as close as possible to the size you think you will need in the game. Now use Edit -> Copy and go to your newly created layer and use Edit -> Paste. Use the Move Tool to get the top left corner of the pasted image as close as possible to where it will be. If your size is still not correct, use the Scale Tool to fix it. 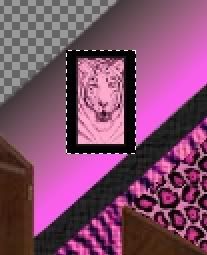 Now choose the Perspective Tool from the toolbox. Click once onto the pasted image to get the Perspective pop up box open. (Click and drag on the bar at the top of the window to move it out of your way, if necessary.) You will notice the "handles" (they look like squares) at the corners of the selection. We will use these to adjust the perspective. 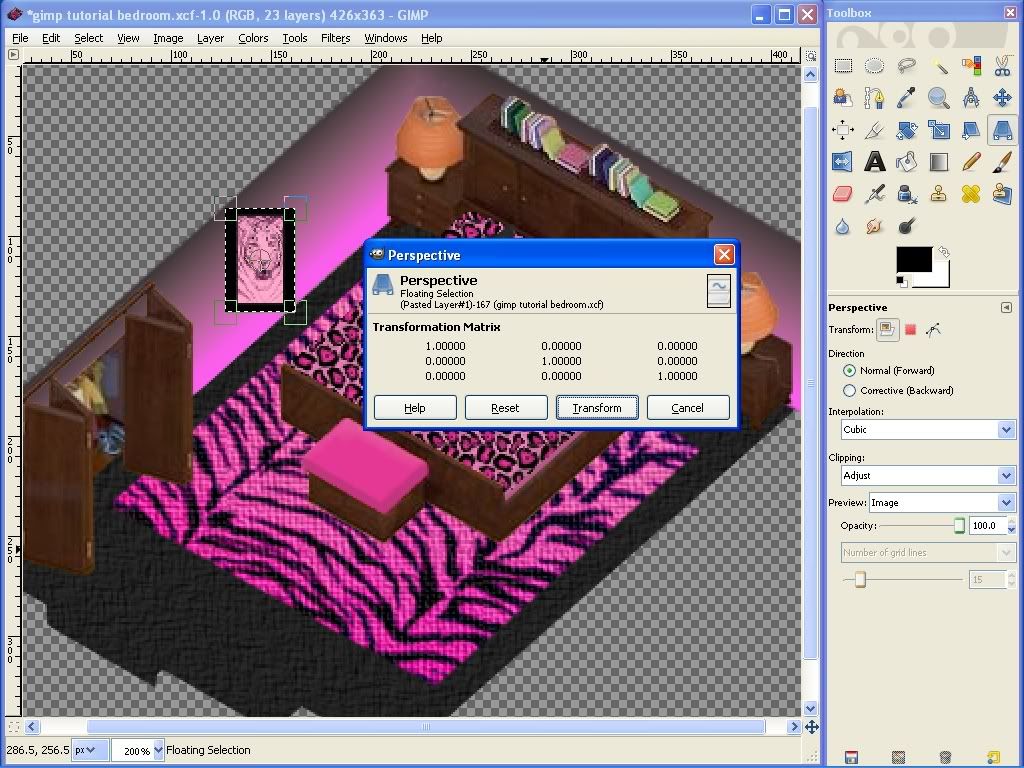 I will use the wall edge as a guide. Because the top left corner is at the wall edge, I will begin with the top right corner. Click and drag the handle for that corner into place.  Next, do the bottom right corner. You will know it is correctly aligned with the top right when the line between them is straight and not jagged. 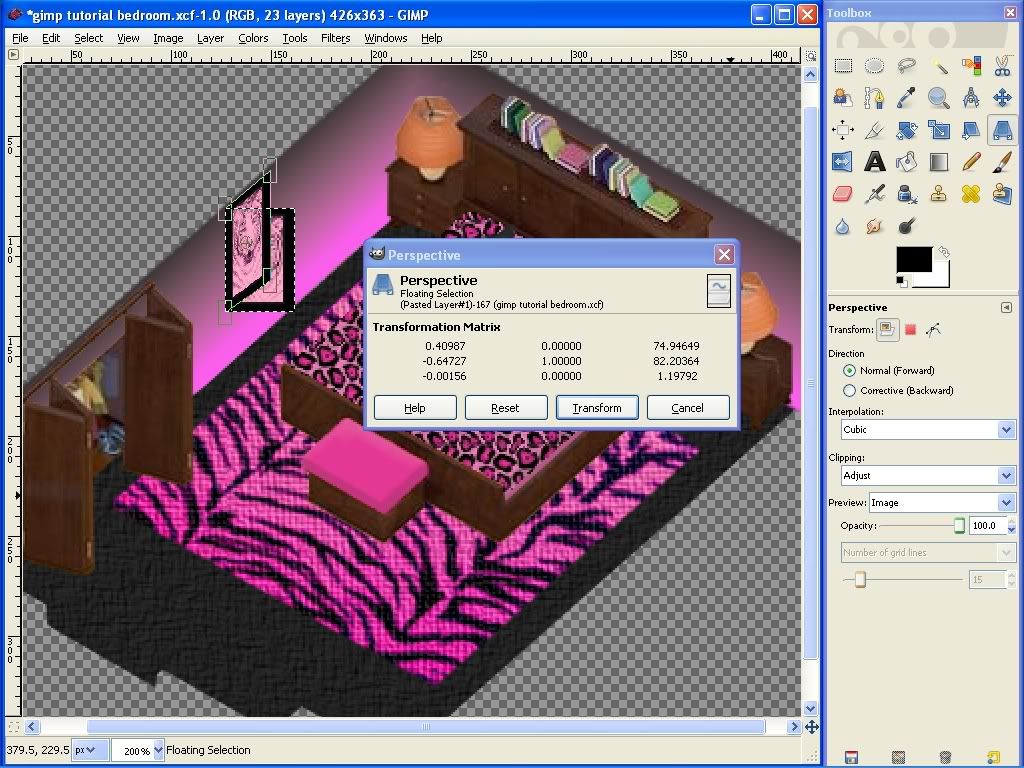 When the perspective appears to be correct, click the "Transform" button on the pop up window to finalize the changes. Use the Move Tool to place the picture where you want it. Don't forget to save your work. You now know enough to finish decorating your room. Use colors, colorize, textures, patterns, gradients, shading and the other techniques you have learned to decorate the lampshades and bases, recolor the furniture, or closet door if you wish.
_________________________
Barbara
Unicorn
Last Day of Work
|
|
Top
|
|
|
|
|
#206459 - 08/03/09 11:07 PM
BayouBlonde's Tutorial for VF Mods Using GIMP
[Re: LadyCFII]
|
Unicorn
Registered: 10/07/04
Posts: 17505
Loc: Colorado
|
Lesson 8: Turning Your Mods Into MapsWhen your room is finished and you are ready to see it in the game, it's time to use that background map we created in the beginning lesson. First make sure you have nothing selected on your room. Use Edit -> Copy Visible (Copy Visible copies what you SEE on the screen, not just what is on the active layer.) Now go to your overall background map you created at the beginning of the tutorial and create a layer named "master bedroom tutorial" or something similar (make sure this layer is the top layer.) Zoom to 100% and use Edit -> Paste. 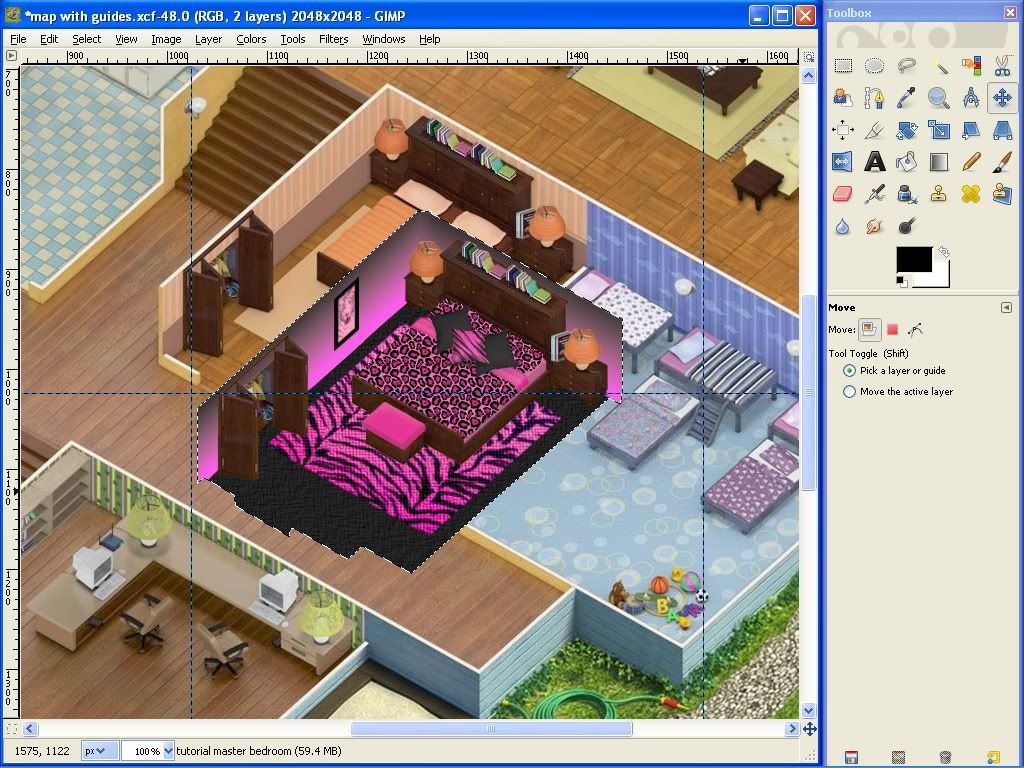 Use the Move Tool to position the room as closely as possible, then zoom in and make sure you are accurate at all edges before anchoring it down. Remember to save your work. At 50% zoom, you can see which map pieces you will need to copy to get the new room into your game. If you are unsure of the names of these pieces, refer to the image in my Introduction to VF Mods guide. Use the Rectangle Select Tool from the toolbox to select a map square. The guidelines will help you stop exactly on the correct pixels. Again, because we want to copy what is on all layers, we will use Edit -> Copy Visible to copy what we see on the screen that is inside our selection. 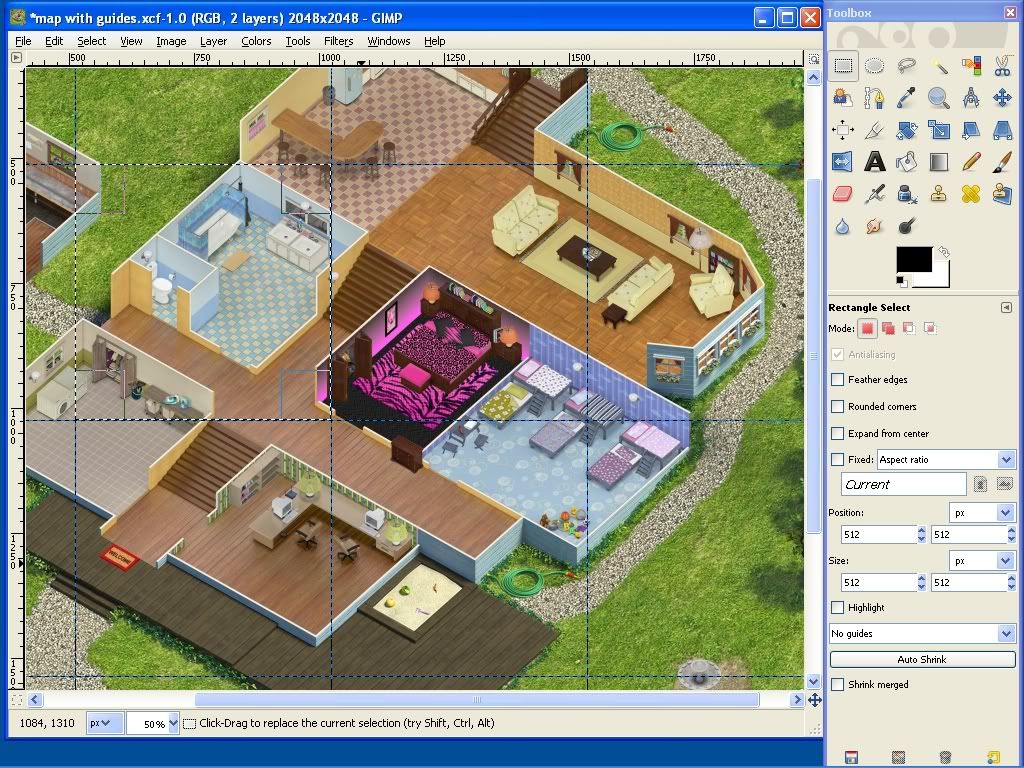 Then use Edit -> Paste As -> New Image. Check the top bar to be sure the image size is 512x512. Then use File -> Save As to save your new map piece. Be sure to save map pieces in jpg format. GIMP will tell you that JPEG images can't handle transparency and ask if you want to export. Click Export. Set the quality level depending upon the file size you want and click Save.  Repeat this for each map piece you need for your room. (There are three for our bedroom.) That's all there is to it! If you've actually made it this far reading, you've learned almost as much as I have about using GIMP and making mods.  There is a lot more for us to learn and a lot of fun to be had in learning it. It can be frustrating as well. I've made some tremendous errors that I end up laughing at later when I finally figure things out. LDW's forum community is wonderful support for those times when you are ready to pull your hair out or just give up. Hang in there and know that we've all felt that way. When you finally get it the way you want it, it's so worth it. I hope you have as much fun with it as I have! Oh, and one last thing (because I probably haven't said it enough) Don't forget to SAVE YOUR WORK!
_________________________
Barbara
Unicorn
Last Day of Work
|
|
Top
|
|
|
|
|
|


 Previous Topic
 Index
Index